Playing In The cat Box
By Danny Martin (American Cycle Auto & Truck)
Well it’s that time again we’re going to dig our hands into the cat box and see what we can come up with. This month I’m going to try to tell you how to change that broken clutch or brake lever on your handlebar controls. It’s going to be simple so when you’re ready you can do it. For this you might need one little specialty tool, but you can get it from your local Drag Specialties dealer while you’re there picking out the multiple different levers. Or you can just have them order you this and it’s a good tool to have in your collection if you don’t already have one. It is the Motion Pro #MP08-0186 Snapring pliers for about $15.00. It will come with some interchangeable extra tips for doing other jobs or to make some jobs like this one even easier. So, run down to your dealer get your tools and your parts and get ready to go.
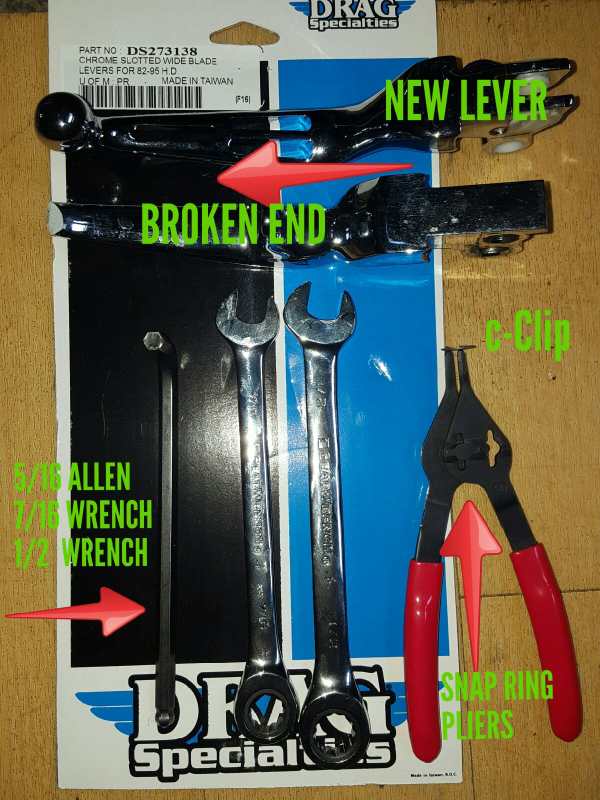
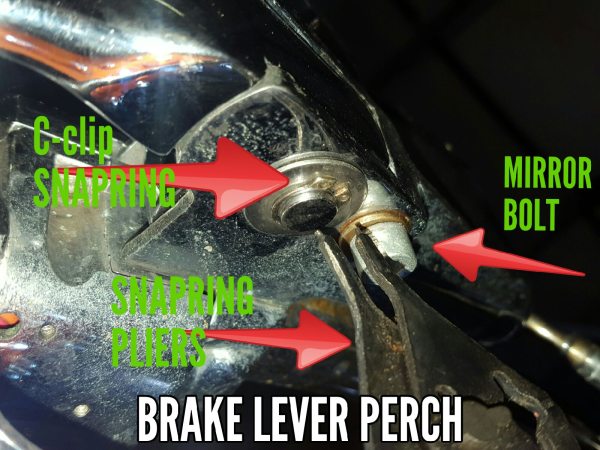
Let’s start with the right-hand side it’s always the easiest, sometimes you may have to loosen the mirror so you take your Allen wrench (if it’s a stock Harley you’ll need a half inch wrench). Loosen the mirror so it will not be in the way of the pin that we need to remove, now with the mirror loose let’s take our snap ring pliers find the funny looking little thing underneath the bottom of the brake lever perch put the tips in the holes squeeze it open and slowly remove it. Be careful do not let this thing go flying or you’ll be looking all over for a little snap ring. Now that we have the clip removed simply push the pin up and slowly ease out your broken brake lever. On some of the older bikes like the one I’m working on, there’s a nipple barrel end fitting in there that you need to realign back up with your brake plunger. Put that all back in and put it back together in reverse order and you have a new brake lever.
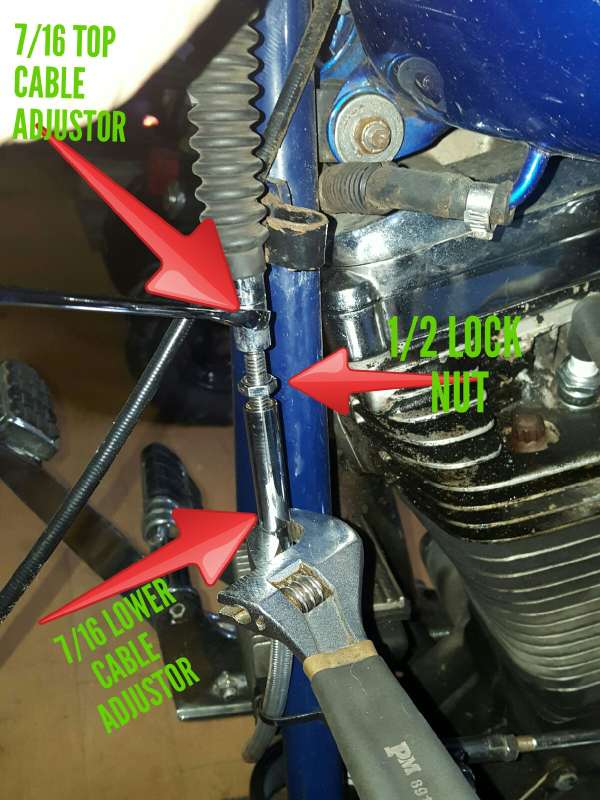
For the left-side it gets a little more complicated. We have to loosen up the clutch cable a little bit so you can get the cable out of the clutch perch. Take your 7/16 or 1/2 inch wrench, locate the adjustment in the middle of your clutch cable and loosen the lock bolt, then put it all together by shortening the cable which will loosen your lever. Once it’s nice and loose you can take your C clip removal tool, your mirrors already loose, push the pin out and wiggle out your clutch lever. Remove and replace the lever with the spacers and things that hold in your clutch cable. Put it all back together and we will readjust the clutch. So, I would guess in this article we’re going to learn how to change levers AND adjust a clutch LOL. Now you will tighten your clutch cable up to a point where there is only about an eighth inch or less of play in your lever. They say to put a nickel between the perch and the lever and that’s about where you need to be adjusted. Tighten up the lock Bolt and you should be ready to go riding.
Now if I have forgotten something or if there is something you would like to give me a chance at showing you how to do. Please contact the magazine or me at AMCAT, I will do all I can to help you. Thank you once again from Thunder Roads Florida and AMCAT’s Cat Box.